Support our educational content for free when you buy through links on our site. Learn more

How Do I Record and Produce My Own Song from Scratch? 🎙️ (2025 Guide)
Ever wondered how some artists manage to create chart-topping hits right from their bedrooms? Spoiler alert: you don’t need a fancy studio or a big budget to record and produce your own song from scratch. In fact, with the right tools, techniques, and a bit of creativity, you can craft professional-quality music that rivals industry standards — all from your home setup. 🎧
Here’s a fun fact to get you hooked: over 90% of the music on streaming platforms today is produced outside traditional studios, thanks to accessible digital audio workstations and affordable gear. But how exactly do you go from a blank canvas to a fully polished track? That’s what we’re diving into — step-by-step, from setting up your home studio to mastering your final mix. And trust us, by the end of this guide, you’ll be ready to unleash your inner producer and make your own sonic magic!
Key Takeaways
- Set up a functional home studio with essential gear like an audio interface (Focusrite Scarlett 2i2), a quality microphone (Rode NT1-A), and a reliable DAW (Ableton Live or Logic Pro X).
- Master the recording process by capturing clean vocals and instruments, using proper mic techniques and room treatment.
- Edit and arrange your tracks carefully, employing comping, noise reduction, and pitch correction to polish performances.
- Mix your song professionally by balancing levels, applying EQ and compression, and adding effects for depth and clarity.
- Master your track to ensure it sounds great across all playback systems and streaming platforms.
- Explore songwriting, remote collaboration, and promotion strategies to elevate your music career beyond production.
Ready to gear up?
- 👉 Shop Audio Interfaces: Amazon | Sweetwater
- 👉 Shop Microphones: Amazon | Sweetwater
- 👉 Shop DAWs: Ableton Live on Amazon | Ableton Official
Dive in, and let’s make some music magic happen! 🎶
Table of Contents
- ⚡️ Quick Tips and Facts for Recording and Producing Your Own Song
- 🎶 The Evolution of DIY Music Production: From Garage Bands to Home Studios
- 🎤 Step 1: Setting Up Your Home Studio for Recording Success
- 🎧 Step 2: Capturing Your Sound – Recording Vocals and Instruments Like a Pro
- ✂️ Step 3: Editing Your Tracks – Cleaning, Comping, and Arranging Your Song
- 🎚️ Step 4: Mixing Your Song – Balancing, EQ, and Effects to Shine
- 🔊 Step 5: Mastering Your Track – Polishing for Professional Sound Quality
- 🎛️ Essential Gear and Software for DIY Music Production
- 💡 Songwriting and Arrangement Tips to Elevate Your Music
- 🧠 Overcoming Common Challenges in Home Music Production
- 🌐 Collaborating Remotely: Tools and Techniques for Online Music Production
- 🚀 Launching Your Music: Distribution, Promotion, and Monetization Strategies
- 🎵 Exploring Different Genres and Production Styles at Home
- 🎙️ Vocal Recording Secrets: Mic Choices, Techniques, and Tips
- 🎹 Using MIDI and Virtual Instruments to Expand Your Sound Palette
- 💻 DAW Deep Dive: Choosing and Mastering Your Digital Audio Workstation
- 🎛️ Mixing Like a Pro: Advanced Techniques and Plugin Recommendations
- 🔍 Troubleshooting Common Recording and Production Issues
- 🎉 Conclusion: Your Journey to Becoming a Self-Sufficient Music Producer
- 🔗 Recommended Links for Music Production Resources
- ❓ Frequently Asked Questions About DIY Song Production
- 📚 Reference Links and Further Reading
⚡️ Quick Tips and Facts for Recording and Producing Your Own Song
Welcome to the thrilling world of making your own song from scratch! 🎵 Whether you’re a bedroom producer or a budding songwriter, here are some golden nuggets from the Make a Song™ team to kickstart your journey:
- Start simple: Use a metronome or click track to keep your timing tight. It’s your musical GPS!
- Invest in a good DAW: Popular choices include Ableton Live, Logic Pro X, and FL Studio.
- Quality audio interface matters: Brands like Focusrite Scarlett and Audient iD4 are industry favorites for clean, low-latency recording.
- Microphone choice depends on your sound: Condenser mics like the Rode NT1-A are great for vocals; dynamic mics like the Shure SM57 excel on instruments.
- Acoustic treatment is a game-changer: Even a few foam panels or bass traps can drastically improve your recordings by reducing room echo.
- Editing is where magic happens: Comping takes the best bits of multiple takes; pitch correction tools like Melodyne or Auto-Tune can save a performance.
- Mixing balances your sonic ingredients: Use EQ, compression, panning, and reverb to create space and depth.
- Mastering polishes your track: It ensures your song sounds great on all devices and streaming platforms.
- Don’t forget your ears: Take breaks and listen on different systems (headphones, car, speakers). Fresh ears catch mistakes!
For a deep dive into each step, keep reading — we’re unpacking everything from gear to mastering secrets. Meanwhile, check out our Make Music guide for inspiration and tips.
🎶 The Evolution of DIY Music Production: From Garage Bands to Home Studios
Music production used to be the exclusive playground of big studios and expensive gear. But oh, how times have changed! Today, you can record a full album in your bedroom with a laptop and a few plugins. Here’s a quick timeline to get you in the groove:
From Analog to Digital: A Brief History
- Late 1800s: Edison’s phonograph captured sound on cylinders — the earliest form of recording.
- 1940s: Magnetic tape revolutionized editing and multi-tracking, giving birth to modern production techniques.
- 1960s-70s: Producers like George Martin and Phil Spector became creative directors, shaping the sound beyond just recording.
- 1980s: Digital recording and MIDI exploded, enabling electronic music and home studios.
- 2000s-now: Affordable DAWs, USB interfaces, and sample libraries democratized music production.
Today, platforms like Soundtrap offer cloud-based collaboration, and producers can access thousands of loops and presets instantly.
Why This Matters to You
Understanding this evolution helps you appreciate the tools at your fingertips. You’re part of a vibrant tradition of DIY creators who can craft professional-sounding music without a Hollywood budget. Dive into our DIY Recording Studio articles for practical setup advice.
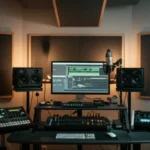
🎤 Step 1: Setting Up Your Home Studio for Recording Success
Before you hit record, your environment needs to be ready. Here’s how to build a functional, inspiring home studio without breaking the bank.
Essential Gear Checklist
| Equipment | Purpose | Recommended Brands/Models |
|---|---|---|
| Computer | Runs your DAW and plugins | MacBook Pro, Dell XPS, custom PC |
| Digital Audio Workstation (DAW) | Record, edit, mix your music | Ableton Live, Logic Pro X, FL Studio |
| Audio Interface | Connects mics/instruments to computer | Focusrite Scarlett 2i2, Audient iD4 MkII |
| Microphone | Captures vocals/instruments | Rode NT1-A (condenser), Shure SM57 (dynamic) |
| Headphones | Monitoring and mixing | Audio-Technica ATH-M50x, Sony MDR-7506 |
| Studio Monitors | Accurate playback | KRK Rokit 5, Yamaha HS5 |
| Acoustic Treatment | Reduces room reflections | Auralex Studiofoam panels, bass traps |
Room Setup Tips
- Choose a quiet, non-reverberant room — closets or small bedrooms work great.
- Place acoustic panels at first reflection points (side walls, ceiling).
- Use rugs and soft furnishings to absorb sound.
- Position monitors at ear level, forming an equilateral triangle with your listening position.
Personal Story: Our Producer’s First Studio
One of our team members started with just a Focusrite Scarlett Solo, a Blue Yeti USB mic, and a corner of their bedroom. After adding a few foam panels and upgrading to Audio-Technica headphones, the clarity of their recordings skyrocketed. It’s proof that you don’t need a fancy studio to make great music — just smart choices!
For detailed setup guides, check our DIY Recording Studio category.
🎧 Step 2: Capturing Your Sound – Recording Vocals and Instruments Like a Pro
Recording is where your song begins to take shape. Here’s how to capture performances that sound authentic and polished.
Preparing to Record
- Warm up your voice or instrument to avoid strain and get the best tone.
- Set levels carefully: Aim for peaks around -6 dBFS to avoid clipping but maintain a strong signal.
- Use a pop filter on vocals to reduce plosives (“p” and “b” sounds).
- Record multiple takes: This gives you options for comping later.
Microphone Techniques
- Vocals: Use a cardioid condenser mic like the Rode NT1-A. Position 6-12 inches from the mouth, slightly off-axis to reduce sibilance.
- Guitar: For acoustic, try a small diaphragm condenser mic near the 12th fret. For electric, mic the amp with a Shure SM57 close to the speaker cone.
- Drums: Use multiple mics — kick, snare, overheads — for a full sound.
Multitrack Recording
Record each instrument separately on its own track in your DAW. This allows you to tweak and fix individual parts without affecting the whole mix.
Pro Tip from Make a Song™:
We always recommend recording a scratch track — a rough version of the song — to guide your performance and keep everyone in sync. It’s your musical safety net!
✂️ Step 3: Editing Your Tracks – Cleaning, Comping, and Arranging Your Song
Editing is where you sculpt your raw recordings into a polished performance. Here’s how to approach it like a pro.
Common Editing Tasks
- Comping: Listen to multiple takes and splice together the best parts into one flawless track.
- Noise reduction: Use tools like iZotope RX to remove hum, clicks, or background noise.
- Timing correction: Fix off-beat notes with DAW tools like Ableton’s warp or Logic’s Flex Time.
- Pitch correction: Subtle use of Melodyne or Auto-Tune can tighten vocal pitch without sounding robotic.
- Arrangement: Move sections around to improve flow — intro, verse, chorus, bridge, outro.
Editing Workflow Tips
- Work at a zoomed-in waveform level for precision.
- Use keyboard shortcuts to speed up your workflow.
- Take breaks to avoid ear fatigue and keep perspective fresh.
Anecdote
One of our producers once spent hours comping a vocal take, only to realize the emotion was lost. They went back and chose a “less perfect” take that felt more alive — proving that technical perfection isn’t everything in music production.
🎚️ Step 4: Mixing Your Song – Balancing, EQ, and Effects to Shine
Mixing is the art of blending all your tracks into a cohesive, engaging sonic experience.
Mixing Fundamentals
| Technique | Purpose | Tips |
|---|---|---|
| Level Balancing | Ensure no instrument overpowers others | Start with drums and bass as foundation |
| Panning | Create stereo space | Pan rhythm guitars left/right, vocals center |
| Equalization (EQ) | Carve out frequency space | Cut muddy lows, boost presence in vocals |
| Compression | Control dynamics | Use gentle ratios (2:1) for natural sound |
| Reverb & Delay | Add depth and atmosphere | Use sparingly to avoid clutter |
| Automation | Add movement and interest | Automate volume or effects for dynamics |
Recommended Plugins
- FabFilter Pro-Q 3: Transparent EQ with dynamic capabilities.
- Waves SSL G-Master Buss Compressor: Classic glue compressor for mix bus.
- Valhalla VintageVerb: Affordable, lush reverb plugin.
Mixing Tips from Make a Song™
- Mix at moderate volume levels to avoid ear fatigue.
- Reference your mix on multiple playback systems (car, earbuds, monitors).
- Use subtractive EQ (cutting frequencies) before boosting to keep clarity.
🔊 Step 5: Mastering Your Track – Polishing for Professional Sound Quality
Mastering is the final polish that prepares your song for release, ensuring it sounds great everywhere.
Mastering Goals
- Maximize loudness without squashing dynamics.
- Balance frequency spectrum so no range is overpowering or missing.
- Enhance stereo width for a spacious feel.
- Ensure consistency across all tracks if mastering an album.
DIY Mastering Tools
- iZotope Ozone: Industry-standard mastering suite with AI-assisted features.
- LANDR: Online automated mastering service for quick results.
- FabFilter Pro-L 2: Transparent limiter with loudness metering.
When to Consider a Professional
If you want your track to compete on streaming platforms or radio, a professional mastering engineer can add that extra level of finesse and objectivity.
🎛️ Essential Gear and Software for DIY Music Production
Here’s a quick rundown of the must-have gear and software that our Make a Song™ pros swear by:
| Gear/Software | Best For | Highlights |
|---|---|---|
| Focusrite Scarlett 2i2 | Audio Interface | Low latency, clean preamps |
| Rode NT1-A | Vocal Recording | Ultra-low noise, warm sound |
| Audio-Technica ATH-M50x | Headphones | Accurate, comfortable for mixing |
| Ableton Live | DAW | Great for electronic music and live performance |
| Logic Pro X | DAW (Mac only) | Powerful, user-friendly, great stock plugins |
| iZotope Ozone | Mastering Suite | AI tools, EQ, compression, limiting |
Where to Buy
- 👉 Shop Focusrite Scarlett on: Amazon | Sweetwater | Focusrite Official Website
- 👉 Shop Rode NT1-A on: Amazon | Sweetwater | Rode Official Website
- 👉 Shop Ableton Live on: Amazon | Ableton Official Website
💡 Songwriting and Arrangement Tips to Elevate Your Music
Great production starts with a great song. Here’s how to get your songwriting and arrangement tight:
Songwriting Essentials
- Start with a strong hook or melody that sticks in the listener’s head.
- Use lyric inspiration to tell a compelling story or evoke emotion. (Explore our Lyric Inspiration category!)
- Keep chord progressions simple but effective — try classic progressions like I–V–vi–IV.
Arrangement Tricks
- Build tension and release by varying dynamics and instrumentation.
- Use intros and outros to set the mood and bookend your song.
- Layer instruments gradually to keep the listener engaged.
Anecdote
One of our songwriters once transformed a bland verse by adding a subtle piano riff underneath — suddenly, the song had a heartbeat! Don’t underestimate the power of arrangement.
🧠 Overcoming Common Challenges in Home Music Production
DIY music production is rewarding but not without hurdles. Here’s how to tackle the most common ones:
Challenge: Room Acoustics
- ❌ Problem: Echo and reverb muddy your recordings.
- ✅ Solution: Add acoustic panels, bass traps, and use close-miking techniques.
Challenge: Technical Overwhelm
- ❌ Problem: Too many plugins and settings can confuse beginners.
- ✅ Solution: Start with stock DAW plugins and learn one effect at a time.
Challenge: Ear Fatigue
- ❌ Problem: Long sessions make your ears tired and less accurate.
- ✅ Solution: Take regular breaks, listen at lower volumes, and switch listening environments.
Challenge: Mixing Confusion
- ❌ Problem: Your mix sounds muddy or unbalanced.
- ✅ Solution: Use reference tracks, apply subtractive EQ, and keep your mix simple.
Remember, every producer faces these — persistence is key! For more tips, visit our Music Industry Insights section.
🌐 Collaborating Remotely: Tools and Techniques for Online Music Production
In today’s connected world, you don’t need to be in the same room to make music together.
Top Platforms for Remote Collaboration
| Platform | Features | Best For |
|---|---|---|
| Soundtrap | Cloud-based DAW with loops | Beginners and casual producers |
| Splice | Sample sharing and project sync | Electronic producers and remixers |
| Kompoz | Online collaboration community | Songwriters and bands |
| Avid Cloud Collaboration | Pro Tools integration | Professional studios |
Tips for Remote Workflow
- Use version control to keep track of project changes.
- Communicate clearly about song structure and edits.
- Share stems (individual track files) for flexibility.
Our team loves Soundtrap for its ease of use and vast sound library — perfect for jumping right into production. Check out their official site to explore.
🚀 Launching Your Music: Distribution, Promotion, and Monetization Strategies
Congrats! Your song is ready to share with the world. But how do you get it heard and make some $$$?
Distribution Platforms
- DistroKid: Fast, affordable distribution to Spotify, Apple Music, Amazon, and more.
- CD Baby: Offers physical and digital distribution plus sync licensing opportunities.
- TuneCore: Comprehensive platform with detailed sales analytics.
Promotion Tips
- Build a social media presence with behind-the-scenes content.
- Submit your song to playlists and music blogs.
- Collaborate with influencers or other artists for cross-promotion.
Monetization Methods
- Streaming royalties via platforms like Spotify and YouTube.
- Sync licensing for TV, films, and ads.
- Selling merchandise or offering exclusive content.
For more insights, dive into our Music Industry Insights articles.
🎵 Exploring Different Genres and Production Styles at Home
Your home studio is your playground — why stick to one style?
Popular Genres for DIY Producers
- Pop: Clean vocals, catchy hooks, and polished production.
- Hip-Hop: Beat-driven, sample-heavy, and vocal-centric.
- Electronic: Synths, loops, and experimental sound design.
- Rock/Indie: Live instruments, raw energy, and organic feel.
Tips for Genre-Specific Production
- Study genre staples and reference tracks.
- Use genre-appropriate plugins and instruments (e.g., drum machines for hip-hop).
- Experiment with hybrid styles to create your unique sound.
Explore our Melody Creation tutorials to craft melodies that fit any genre.
🎙️ Vocal Recording Secrets: Mic Choices, Techniques, and Tips
Vocals are often the heart of a song. Here’s how to capture them beautifully.
Microphone Recommendations
| Mic Model | Type | Best For |
|---|---|---|
| Rode NT1-A | Condenser | Warm, clear vocals |
| Shure SM7B | Dynamic | Rock, broadcast, untreated rooms |
| Audio-Technica AT4040 | Condenser | Versatile, detailed vocals |
Recording Tips
- Use a pop filter to reduce plosives.
- Record in a treated room or use a reflection filter.
- Maintain consistent mic distance for even tone.
- Warm up your voice and hydrate before recording.
Pro Tip
Double-track your vocals (record the same part twice) and pan them left and right for a fuller sound.
🎹 Using MIDI and Virtual Instruments to Expand Your Sound Palette
MIDI is your secret weapon for limitless creativity.
What is MIDI?
MIDI (Musical Instrument Digital Interface) sends performance data (notes, velocity) to virtual instruments inside your DAW.
Benefits
- Access thousands of sounds without physical instruments.
- Edit notes and timing after recording.
- Layer multiple instruments for rich textures.
Popular Virtual Instruments
- Native Instruments Komplete: Massive collection of synths, pianos, drums.
- Spectrasonics Omnisphere: Powerful synth with unique sounds.
- XLN Audio Addictive Drums: Realistic drum kits and grooves.
Try experimenting with MIDI if you want to add orchestral strings, synth pads, or electronic beats without owning the gear.
💻 DAW Deep Dive: Choosing and Mastering Your Digital Audio Workstation
Your DAW is the heart of your production setup. Choosing the right one can make a huge difference.
Popular DAWs Compared
| DAW | Platform | Strengths | Learning Curve |
|---|---|---|---|
| Ableton Live | Mac, Windows | Live performance, electronic music | Moderate |
| Logic Pro X | Mac only | Comprehensive, great stock plugins | Beginner-friendly |
| FL Studio | Mac, Windows | Beat making, intuitive interface | Easy |
| Pro Tools | Mac, Windows | Industry standard, audio editing | Steep |
| GarageBand | Mac only | Beginner-friendly, free | Very easy |
Tips to Master Your DAW
- Follow tutorials specific to your DAW on YouTube or platforms like Groove3.
- Use templates to speed up your workflow.
- Learn keyboard shortcuts to save time.
- Experiment with built-in effects and instruments.
Our team recommends starting with Logic Pro X if you’re on Mac, or Ableton Live for versatile production. For beginners, GarageBand is a fantastic free option.
🎛️ Mixing Like a Pro: Advanced Techniques and Plugin Recommendations
Ready to take your mixes to the next level? Here’s how.
Advanced Mixing Techniques
- Parallel Compression: Blend a heavily compressed duplicate with the original for punch without losing dynamics.
- Mid/Side EQ: Process center and side signals separately to widen the mix.
- Automation: Use volume, pan, and effect automation to add movement and emotion.
- Saturation: Add subtle harmonic distortion for warmth and character.
Pro Plugin Recommendations
| Plugin | Use Case | Why We Love It |
|---|---|---|
| FabFilter Pro-MB | Multiband compression | Transparent, flexible |
| Soundtoys Decapitator | Saturation/distortion | Adds analog warmth |
| Waves CLA-2A | Vocal compression | Smooth, musical compression |
| Valhalla Delay | Creative delay effects | Affordable, lush sounds |
🔍 Troubleshooting Common Recording and Production Issues
Even seasoned producers hit snags. Here’s how to troubleshoot:
Problem: Latency Delays
- Cause: Audio interface buffer size too high.
- Fix: Lower buffer size during recording; increase during mixing.
Problem: Background Noise
- Cause: Poor room acoustics or mic interference.
- Fix: Use noise gates, acoustic treatment, and shield cables.
Problem: Muddy Mix
- Cause: Overlapping frequencies, too much low-mid energy.
- Fix: Use subtractive EQ to carve space; high-pass filter non-bass instruments.
Problem: Vocal Sibilance
- Cause: Excessive “s” sounds.
- Fix: Use de-esser plugins like FabFilter Pro-DS.
That’s a wrap on the core steps and insights for recording and producing your own song from scratch! Ready to dive deeper? Our Instrument Tutorials and Melody Creation sections are packed with expert advice to keep you inspired and improving.
Keep experimenting, stay curious, and remember — every great producer started exactly where you are now. 🎶🔥
🎉 Conclusion: Your Journey to Becoming a Self-Sufficient Music Producer
Wow, what a ride! From setting up your very first home studio to mastering your track for release, you now have a comprehensive roadmap to record and produce your own song from scratch. Remember, the magic lies not just in the gear or software, but in your creativity, persistence, and willingness to learn.
We’ve covered everything: the essential gear (like Focusrite Scarlett interfaces and Rode NT1-A microphones), the step-by-step recording process, the art of editing and mixing, and the final polish of mastering. Plus, we explored songwriting tips, remote collaboration tools, and even how to promote your music once it’s ready to share.
If you’re feeling overwhelmed, that’s totally normal — even the pros started somewhere! The key is to start simple, build your skills gradually, and don’t be afraid to experiment. Your home studio is your creative sanctuary, and every session brings you closer to your unique sound.
So, are you ready to make your musical dreams a reality? We’re confident you’ve got everything you need to start producing tracks that sound professional and truly yours. Keep exploring our Make Music resources, and don’t hesitate to reach out to the community for support.
Happy producing! 🎶🚀
🔗 Recommended Links for Music Production Resources
Ready to gear up and get started? Here are some trusted products and resources we recommend, all linked for your convenience:
-
Focusrite Scarlett 2i2 Audio Interface:
Amazon | Sweetwater | Focusrite Official Website -
Rode NT1-A Vocal Microphone:
Amazon | Sweetwater | Rode Official Website -
Audio-Technica ATH-M50x Headphones:
Amazon | Sweetwater | Audio-Technica Official Website -
Ableton Live DAW:
Amazon | Ableton Official Website -
iZotope Ozone Mastering Suite:
Amazon | iZotope Official Website -
Books for Further Learning:
❓ Frequently Asked Questions About DIY Song Production
What equipment do I need to record a song at home?
To get started, you’ll need a computer capable of running a Digital Audio Workstation (DAW), an audio interface to connect microphones and instruments, a microphone suited to your recording needs (condenser mics like the Rode NT1-A are great for vocals), and monitoring headphones or studio monitors for accurate listening. Acoustic treatment like foam panels can greatly improve recording quality by reducing room reflections. This setup balances quality and affordability, allowing you to produce professional-sounding recordings without a commercial studio.
How do I write a song from scratch with a catchy melody and meaningful lyrics?
Start with a strong concept or emotion you want to express. Use simple chord progressions (like I–V–vi–IV) as a foundation and experiment with melodies that complement the mood. Lyrics should tell a story or evoke feelings, so draw inspiration from personal experiences or storytelling techniques. Tools like rhyming dictionaries and songwriting prompts can help. Remember, the hook is your song’s “earworm”—make it memorable and singable. For more inspiration, explore our Lyric Inspiration section.
What are the best software and tools for music production and editing?
Your choice depends on your style and budget. Popular DAWs include Ableton Live (excellent for electronic music and live performance), Logic Pro X (Mac users love its user-friendly interface and powerful stock plugins), and FL Studio (great for beat-making). For editing, plugins like FabFilter Pro-Q (EQ), Waves Mercury Bundle (comprehensive effects), and iZotope RX (noise reduction) are industry standards. Many DAWs come with quality built-in tools, so start there and expand as you grow.
How can I mix and master my own song to make it sound professional and radio-ready?
Mixing involves balancing levels, panning instruments in the stereo field, applying EQ to carve out frequency space, compressing dynamics for consistency, and adding effects like reverb and delay for depth. Use reference tracks to compare your mix. Mastering is the final step, where you optimize loudness, balance frequencies, and prepare your track for distribution. Tools like iZotope Ozone provide user-friendly mastering suites. If possible, consider professional mastering services for the best results, especially for commercial releases.
How do I overcome common challenges like latency and background noise in home recordings?
Latency can be minimized by adjusting your audio interface’s buffer size—lower during recording, higher during mixing. Background noise often comes from room acoustics or electrical interference; use acoustic treatment, shielded cables, and noise gates to reduce it. Recording in a quiet space and using directional microphones also helps. Patience and experimentation are key to troubleshooting these issues.
What are the benefits of using MIDI and virtual instruments in my productions?
MIDI lets you control virtual instruments, enabling you to create complex arrangements without physical gear. It’s flexible—you can edit notes, timing, and velocity after recording. Virtual instruments like Native Instruments Komplete or Spectrasonics Omnisphere offer vast sound libraries, from realistic pianos to futuristic synths. This expands your creative palette and saves space and cost.
📚 Reference Links and Further Reading
- Focusrite Scarlett 2i2 Official Website
- Rode NT1-A Microphone Official Page
- Ableton Live Official Site
- iZotope Ozone Mastering Suite
- Soundtrap – Make Music Online
- Sweetwater Music Gear
- Music Production Tutorials on Make a Song™
- Lyric Inspiration on Make a Song™
- Music Industry Insights on Make a Song™
Ready to take your music to the next level? Dive into these resources and start creating your masterpiece today! 🎶✨